Dashing-jenkins job
Jenkins widget for Dashing-JS
Jenkins Job Dashing widget
Author: Julian Kleinhans · Blog: http://blog.kj187.de
Dashing-JS is a NodeJS port of Dashing, an Sinatra based framework that lets you build beautiful dashboards.
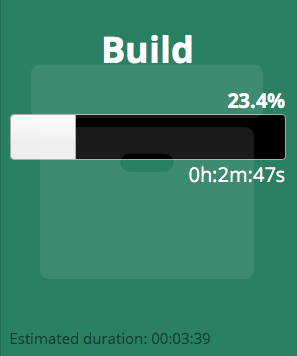
The Jenkins Job widget is a generic widget for Jenkins jobs which provides a highly visible view of the build status and build progress of selected Jenkins jobs. Via configuration it is possible to add multiple widgets for different Jenkins jobs.
Preview

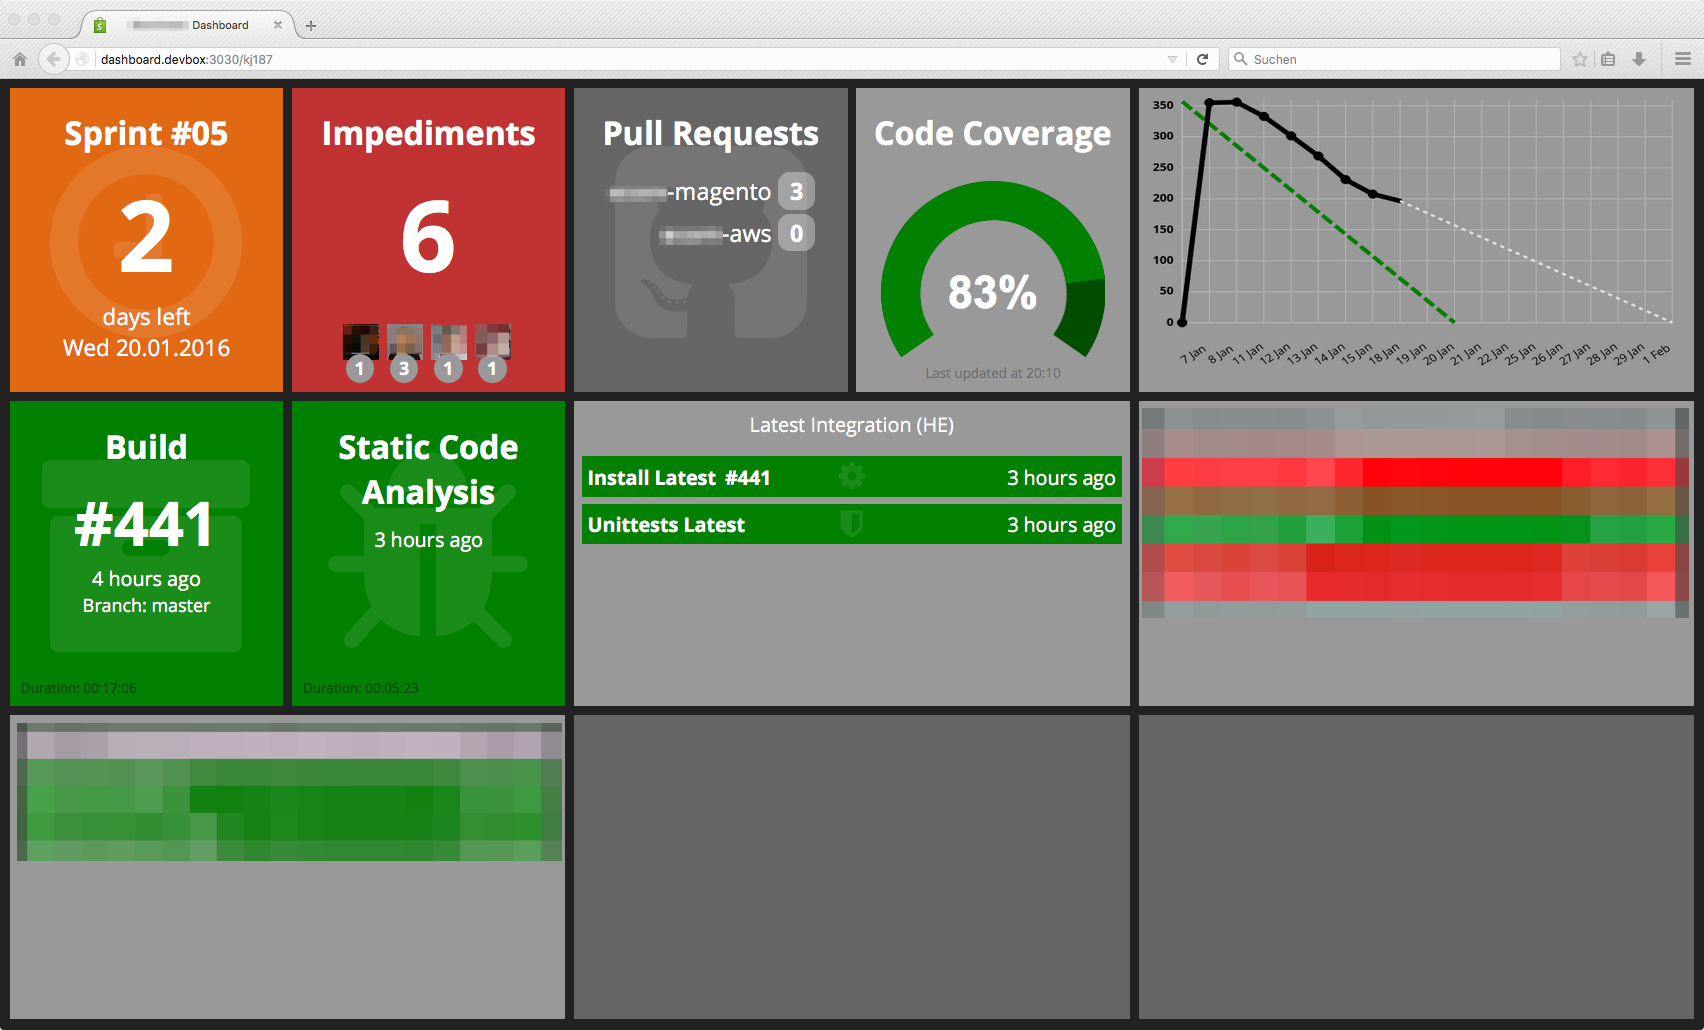
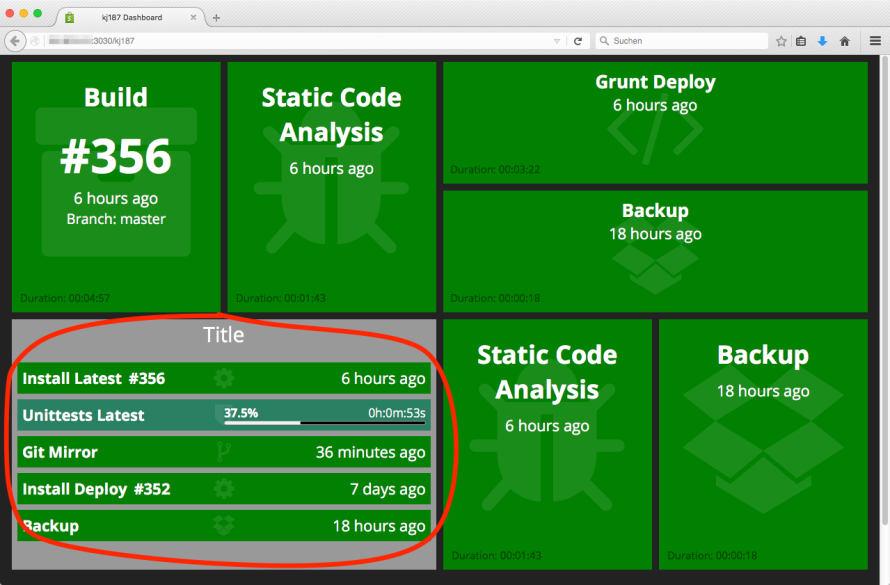
Reallife example
Here you can see what you can achive only with Dashing-JS and this Jenkins Job widget.
With other third party widgets
Requirements
$ npm install -g dashing-js
Jenkins Job Widget dependencies
$ npm install jenkins-api
$ npm install cron
$ npm install moment
$ npm install request
$ npm install memory-cache
Installation
$ dashing-js install https://github.com/kj187/dashing-jenkins_job/archive/master.zipCreate a new directory config on your root directory.
Move the widgets/jenkins_job/config.jenkins_job.sample.js file to this directory and rename it to config.jenkins_job.js.
assets/
  ...
config/
  config.jenkins_job.js
  ...
dashboards/
  ...
jobs/
  ...
...
The progressbar requires the jQueryUI styles and javascript lib. Add the following lines to your dashboards/layout.ejs
<script type="text/javascript" src="//cdnjs.cloudflare.com/ajax/libs/jqueryui/1.11.4/jquery-ui.min.js"></script>
<link rel="stylesheet" href="//cdnjs.cloudflare.com/ajax/libs/jqueryui/1.11.4/jquery-ui.min.css">
or if you use Jade as your favorite template engine
script(src='//cdnjs.cloudflare.com/ajax/libs/jqueryui/1.11.4/jquery-ui.min.js')
link(rel='stylesheet', href='//cdnjs.cloudflare.com/ajax/libs/jqueryui/1.11.4/jquery-ui.min.css')
Usage
To include the widget on your dashboard, add the following snippet to the dashboard layout file:
<li data-row="1" data-col="1" data-sizex="1" data-sizey="1" class="widget-jenkins_job">
  <div data-id="build" data-view="JenkinsJob" data-bind-class="result | append additionalclass" data-additionalclass=" widget"></div>
  <i class="fa fa-archive icon-background"></i>
</li>
Or again, if you use Jade as your favorite template engine
li(data-row='1', data-col='1', data-sizex='1', data-sizey='1', class='widget-jenkins_job')
  div(data-id='build', data-view='JenkinsJob', data-bind-class='result | append additionalclass', data-additionalclass=' widget')
  i(class='fa fa-archive icon-background')
You can add multiple widgets for different Jenkins jobs. Each widget must have his own unqiue data-id. My suggestion is to get the Jenkins job name for data-id.
Settings
To actually use the widget on your own Dashboard, you'll have to have an access token from your Jenkins server. If you don`t have an access token you can also use your username and password.
Minimum settings example
module.exports = {

    protocol: 'https',
    username: 'YOUR_JENKINS_USERNAME',
    token: 'YOUR_JENKINS_ACCESS_TOKEN_OR_PLAINTEXT_PASSWORD',
    host: 'YOUR_JENKINS_HOST',

    jobs: [
        {
            id: 'build',
            displayName: 'Build',
            eventName: 'build',
            cronInterval: '*/1 * * * * *',
            apiMethod: 'last_build_info',

            displayArguments: {
                title_isEnabled: true,
                buildNumber_isEnabled: true,
                timeAgo_isEnabled: true,
                branch_isEnabled: true,
                displayDuration_isEnabled: true
            },
        },
    ]
}
Reallife settings example
module.exports = {

    protocol: 'https',
    username: 'YOUR_JENKINS_USERNAME',
    token: 'YOUR_JENKINS_ACCESS_TOKEN_OR_PLAINTEXT_PASSWORD',
    host: 'YOUR_JENKINS_HOST',

    jobs: [
        {
            id: 'build',
            displayName: 'Build',
            eventName: 'build',
            cronInterval: '*/1 * * * * *',
            apiMethod: 'last_build_info',

            displayArguments: {
                title_isEnabled: true,
                buildNumber_isEnabled: true,
                timeAgo_isEnabled: true,
                branch_isEnabled: true,
                displayDuration_isEnabled: true
            },

            parameterizedAttributes: [
                {
                    attributeName: 'branch',
                    jenkinsParameterName: 'BRANCH_TO_BUILD'
                }
            ]
        },
        {
            id: 'static_code_analysis',
            displayName: 'Static Code Analysis',
            eventName: 'static_code_analysis',
            cronInterval: '*/1 * * * * *',
            apiMethod: 'last_build_info',

            displayArguments: {
                title_isEnabled: true,
                buildNumber_isEnabled: false,
                timeAgo_isEnabled: true,
                branch_isEnabled: false,
                displayDuration_isEnabled: true
            }
        },
        {
            id: 'install_latest',
            displayName: 'Install Latest',
            eventName: 'install_latest',
            cronInterval: '*/1 * * * * *',
            apiMethod: 'last_build_info',

            externalBuildNumber: {
               url: 'http://latest.your_application_url.host/build.txt'
            },

            displayArguments: {
                title_isEnabled: true,
                buildNumber_isEnabled: true,
                timeAgo_isEnabled: true,
                branch_isEnabled: false,
                displayDuration_isEnabled: true
            }
        }
    ]
}
Jenkins settings
| Setting | Example | Description |
|---|---|---|
| protocol | https | Http protocol of your Jenkins server |
| username | julian.kleinhans | Username for authentication |
| token | ABCDEFG12345JHKLLAIJJ | Access token or plaintext password for authentication |
| host | jenkins-ci.kj187.de | Host of your Jenkins server |
jobs
You can define multiple jobs, keep in mind to add the html snippet in your dashboard layout file
| Setting | Example | Description |
|---|---|---|
| id | build | Jenkins job name |
| displayName | Build | Widget title |
| eventName | build | Event name, must be the same as the data-id attribute |
| cronInterval | */1 * * * * * | Click here for available cron patterns |
| apiMethod | last_build_info | Jenkins API method. Don`t change this value! |
displayArguments
displayArguments gives you the possibility to show or hide some parts in your widget
| Setting | Example | Description |
|---|---|---|
| title_isEnabled | true | Show title |
| buildNumber_isEnabled | true | Show buildnumber |
| timeAgo_isEnabled | true | Show time of last execution |
| branch_isEnabled | false | Don`t show the branch name |
| displayDuration_isEnabled | true | Show the duration time |
parameterizedAttributes
In Jenkins it is possible to create your own attributes (parameterized attributes). With this array it is possible to read this dynamical attributes and bind them onto a variable.
| Setting | Example | Description |
|---|---|---|
| attributeName | branch | Attribute name which is available for the data-bind argument |
| jenkinsParameterName | BRANCH_TO_BUILD | The name of your own Jenkins parameter |
externalBuildNumber
Imagine that you have two Jenkins jobs. A build job, which creates an build artifact and an install job, which installs the build artifact on a server. Each job has his own buildnumber. But, for the second install job, we would like to know which build artifact - from the first jenkins job - was installed. With this setting you can get the installed buildnumber via an text file. This requires that you have created an build.txt file in the first job and it was also deployed on your target node.
| Setting | Example | Description |
|---|---|---|
| url | http://latest.your_application_url.host/build.txt | Text file URL which includes only the buildnumber of an artifact which is installed on that node |
To create a build.txt file is quite simple, just add the follwing line to your Jenkins job where you build the artifact.
echo "${BUILD_NUMBER}" > artifacts/build.txt
BUILD_NUMBER is an global Jenkins variable, which includes the current build number. Make sure to deploy this file into the DOCUMENT_ROOT of your target node, so that it is reachable with an URL like http://latest.your_application_url.host/build.txt
Layout
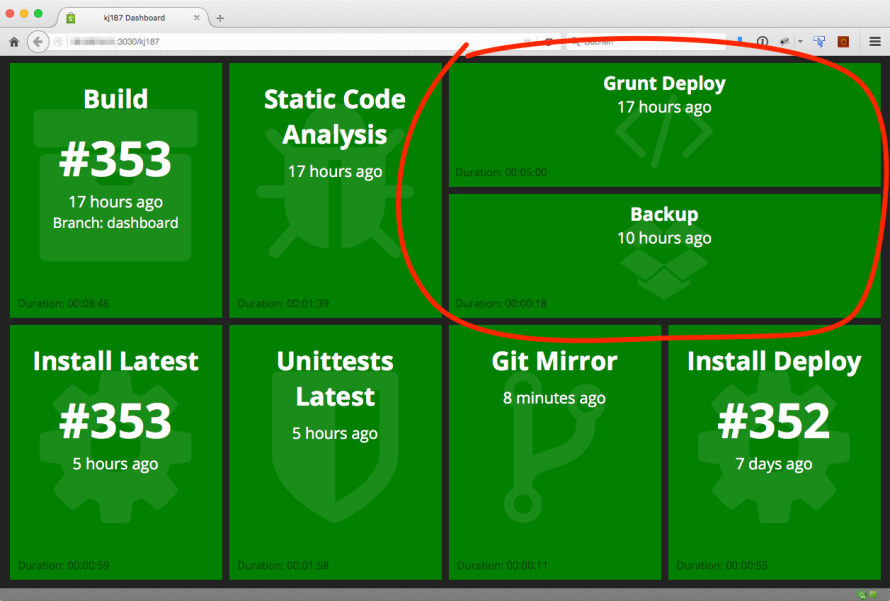
Half sized widgets
The Jenkins Job widget provides you also the possibility to show a widget in the half size, so instead of one normal widget you can display two small widgets.
Example

HTML
Just switch your dashboard HTML to the following
<li data-row="1" data-col="3" data-sizex="2" data-sizey="1">
  <div class="widget-jenkins_job two-row-container">
    <div data-id="grunt_deploy" data-view="JenkinsJob" data-bind-class="result | prepend additionalclass" data-additionalclass="widget two-row-widget "></div>
    <i class="fa fa-code icon-background"></i>
  </div>
  <div class="widget-jenkins_job two-row-container">
    <div data-id="create_backup" data-view="JenkinsJob" data-bind-class="result | prepend additionalclass" data-additionalclass="widget two-row-widget "></div>
    <i class="fa fa-dropbox icon-background fa-3"></i>
  </div>
</li>
Or if you use Jade
li(data-row='1', data-col='2', data-sizex='1', data-sizey='1')
  div(class='widget-jenkins_job two-row-container')
    div(data-id='grunt_deploy', data-view='JenkinsJob', data-bind-class='result | prepend additionalclass', data-additionalclass='widget two-row-widget ')
    li(class='fa fa-code icon-background')
  div(class='widget-jenkins_job two-row-container')
    div(data-id='create_backup', data-view='JenkinsJob', data-bind-class='result | prepend additionalclass', data-additionalclass='widget two-row-widget ')
    li(class='fa fa-code icon-background')
The first example uses a data-sizex="2" attribute and the second data-sizex="1".
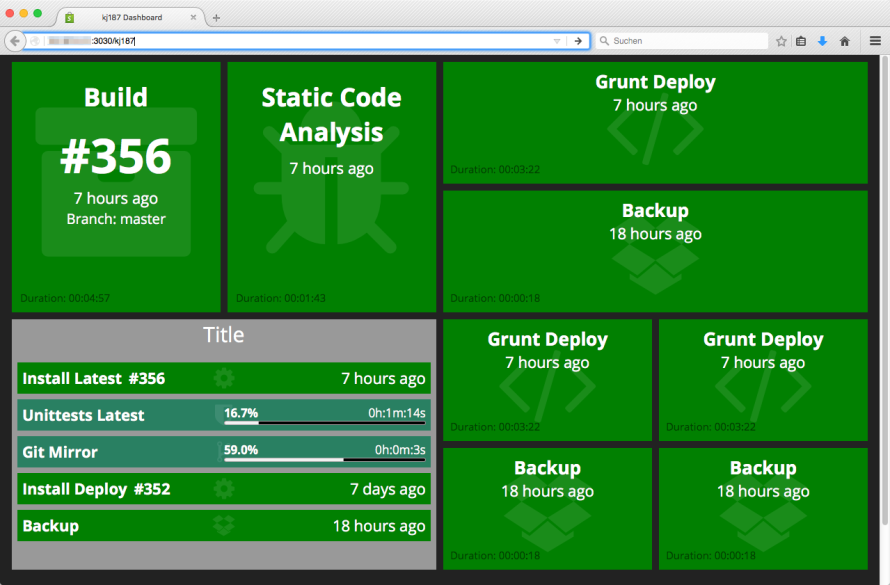
List style with multiple widgets
The Jenkins Job widget provides you also the possibility to show multiple widgets as a list. You can also set a container headline. One use case could be to collect all jobs from a node.
Example
HTML
Just switch your dashboard HTML to the following
<li data-row="2" data-col="1" data-sizex="2" data-sizey="1">
  <div class="widget-jenkins_job widget container">
    <h1 class="stackTitle">Title</h1>
    <div class="widget-jenkins_job item">
      <div data-id="install_latest" data-view="JenkinsJob" data-bind-class="result | append additionalclass" data-additionalclass=" widget"></div>
      <i class="fa fa-cog icon-background"></i>
    </div>
    <div class="widget-jenkins_job item">
      <div data-id="unittest_latest" data-view="JenkinsJob" data-bind-class="result | append additionalclass" data-additionalclass=" widget"></div>
      <i class="fa fa-shield icon-background"></i>
    </div>
    <!-- ... -->
  </div>
</li>
Or if you use Jade
li(data-row='1', data-col='1', data-sizex='1', data-sizey='1')
  div(class='widget-jenkins_job widget container')
    h1(title='Titel', class='stackTitle')
    div(class='widget-jenkins_job item')
      div(data-id='install_latest', data-view='JenkinsJob', data-bind-class='result | prepend additionalclass', data-additionalclass='widget ')
      li(class='fa fa-code icon-background')
    div(class='widget-jenkins_job item')
      div(data-id='unittest_latest', data-view='JenkinsJob', data-bind-class='result | prepend additionalclass', data-additionalclass='widget ')
      li(class='fa fa-shield icon-background')
    // ...
Have fun :-)
Changelog
release-1.1.0
- Add caching for externalBuildNumber. You have to install "memory-cache" via npm
- Add stackTitle class
release-1.0.0
- First release
Other Dashing-JS widgets
Do you know that I also created some other Dashing-JS widgets? Try out